For you

Hello friends!

I’m back again today with another project using gorgeous Altenew products.

My card features the beautiful clear stamp set called Paint-A-Flower: Spider Mums.

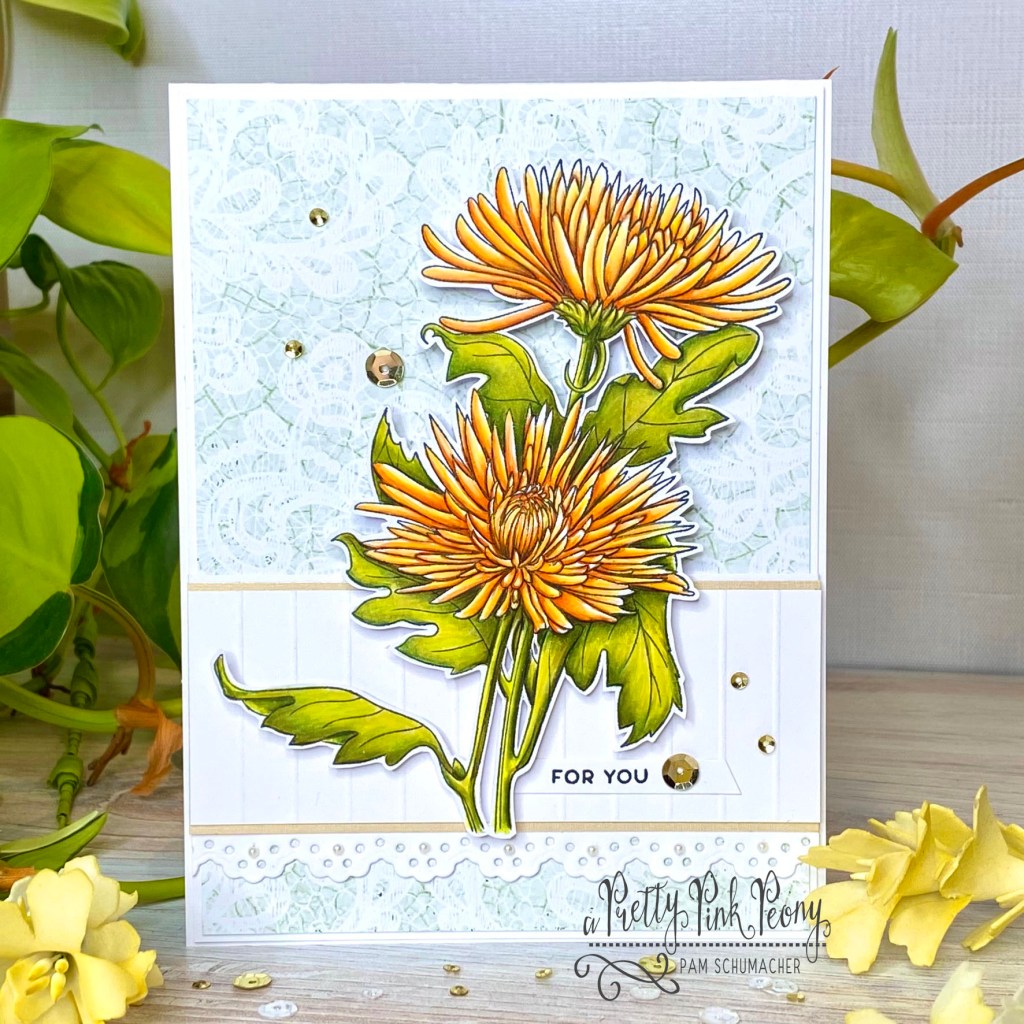
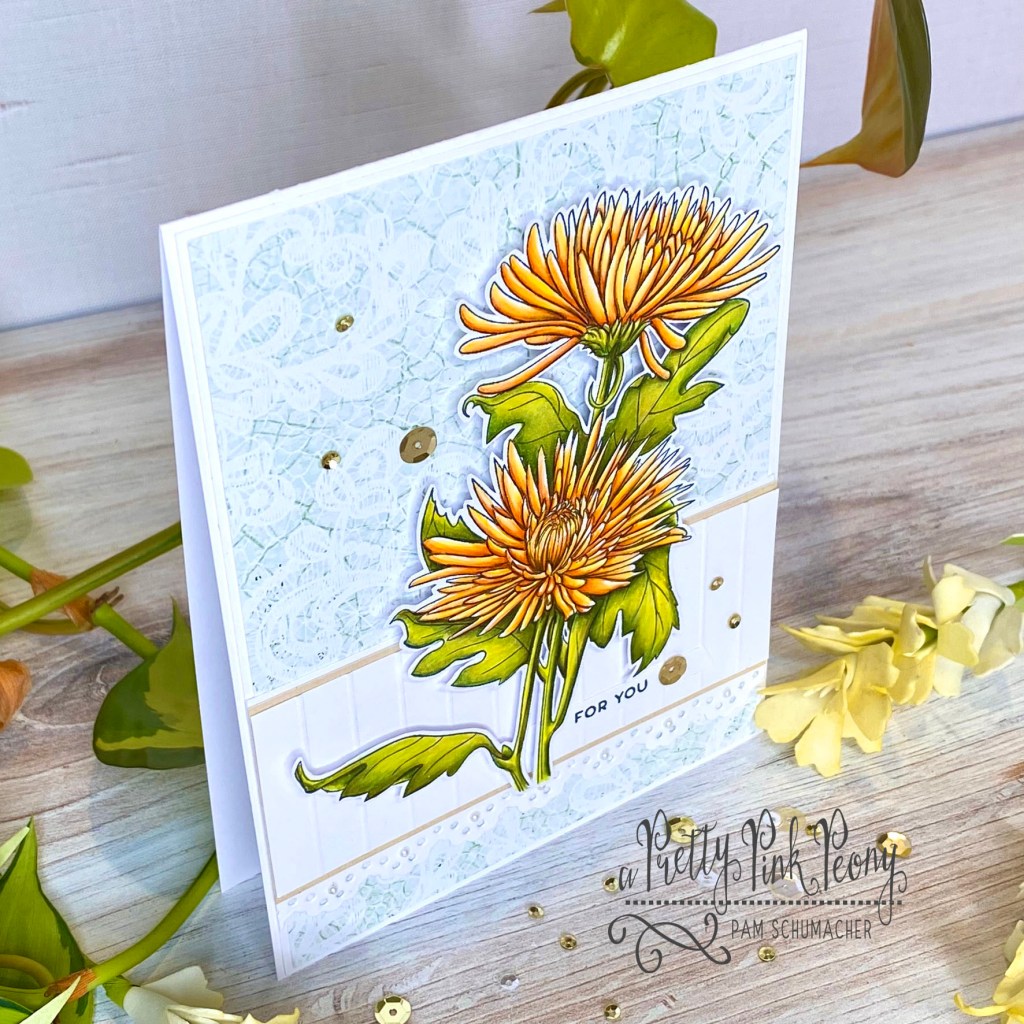
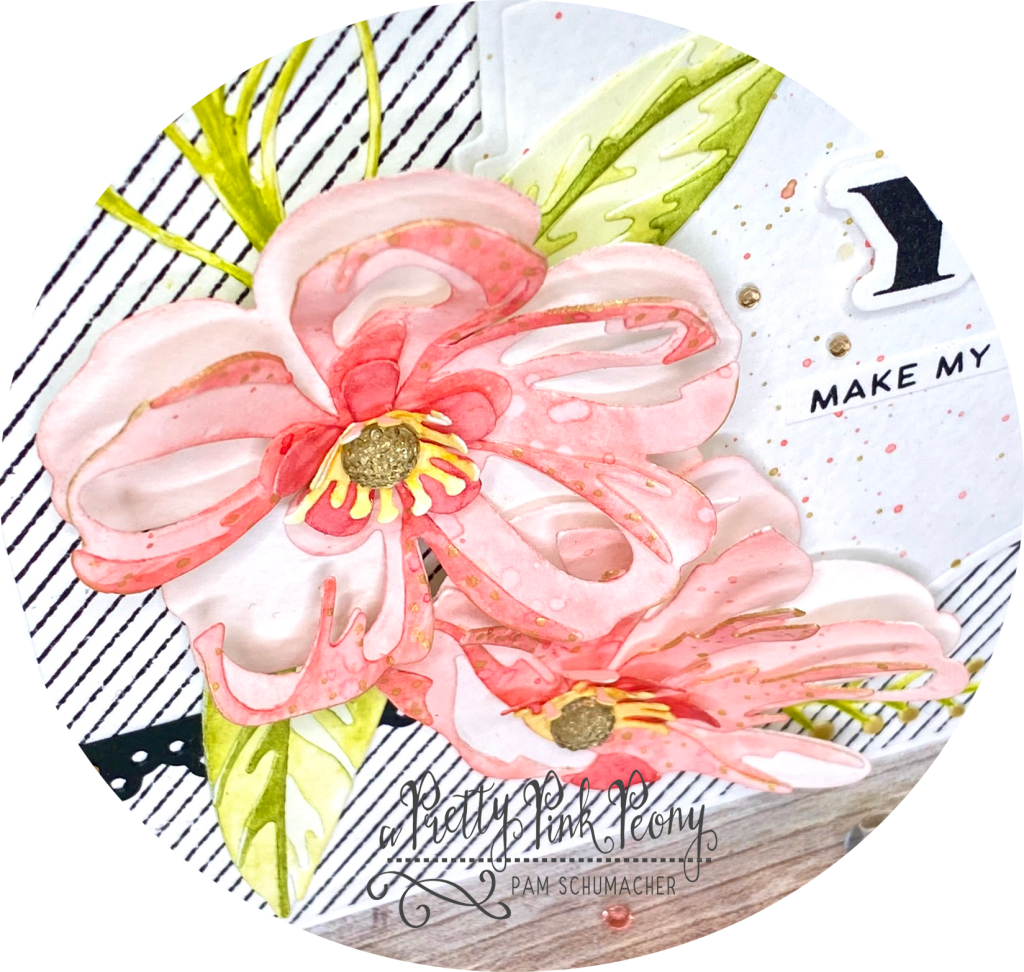
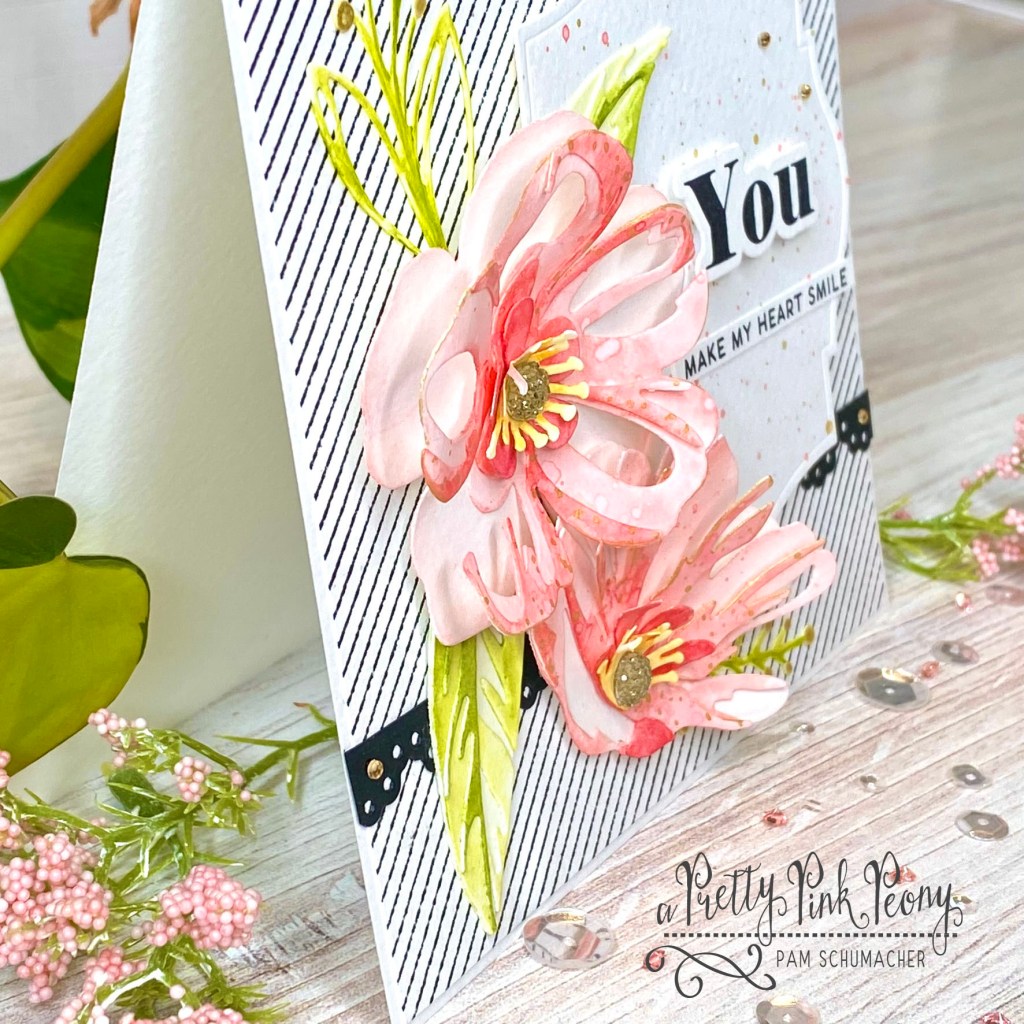
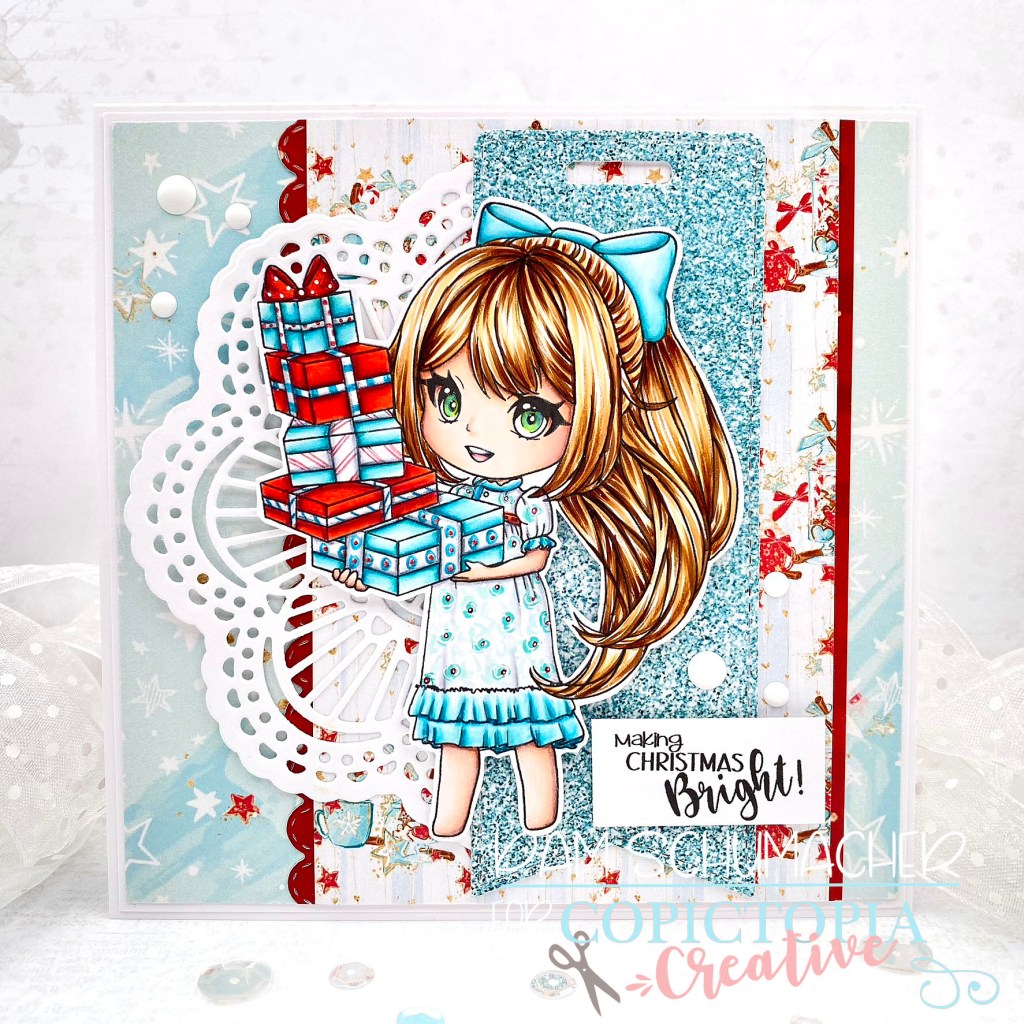
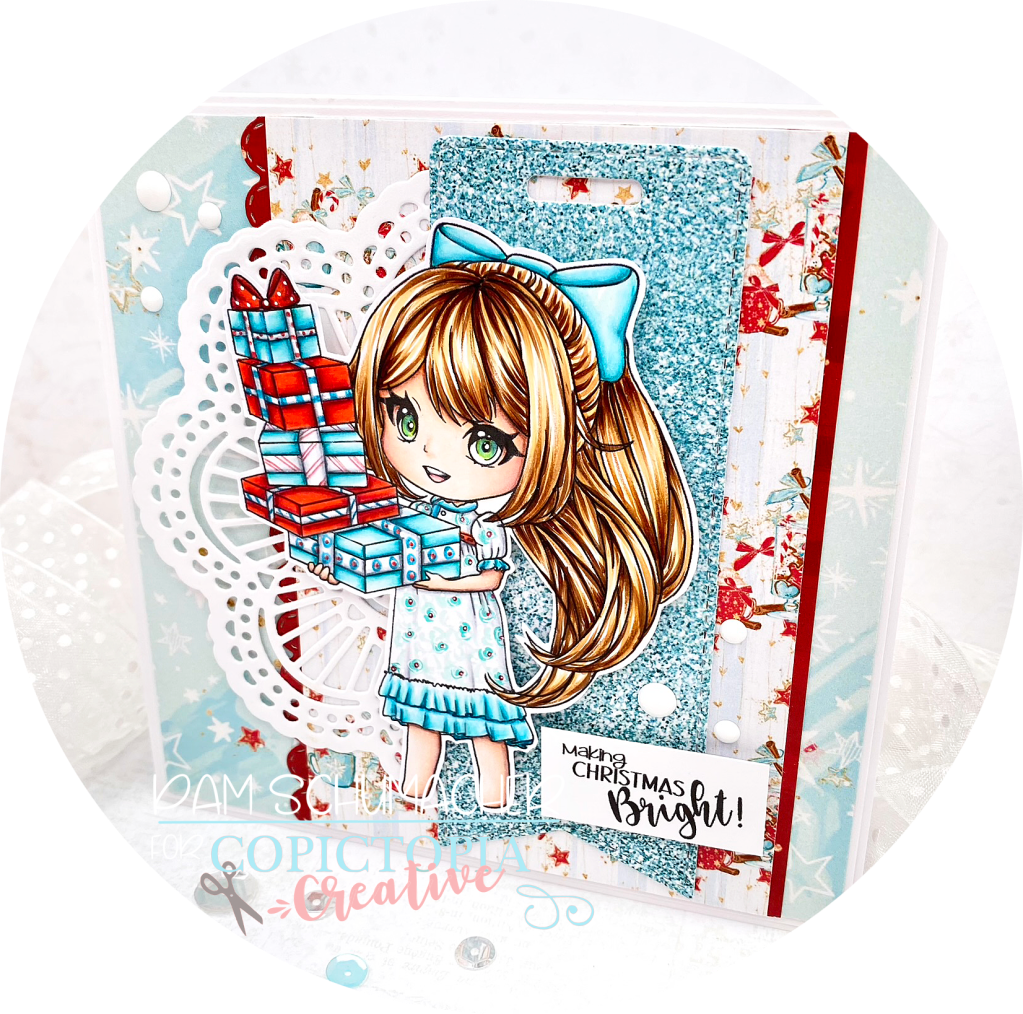
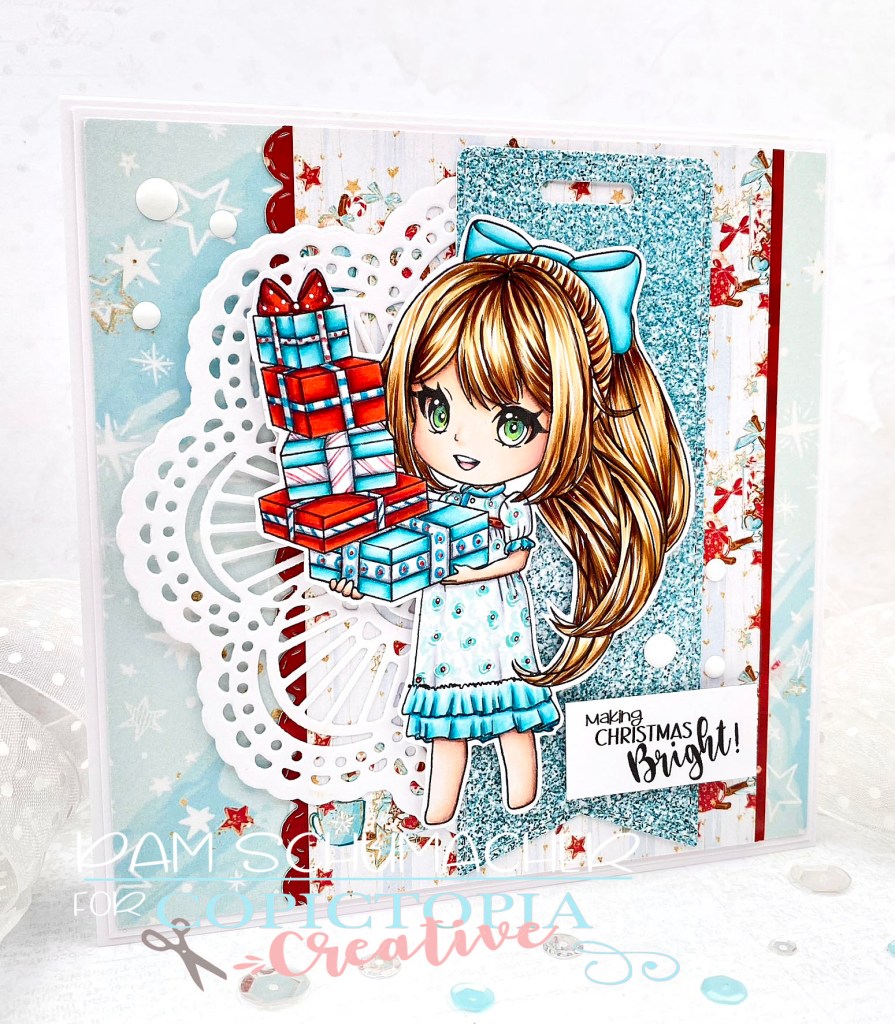
I had a hard time choosing a color for these beauties! I always seem to reach for the pinks…oops!!


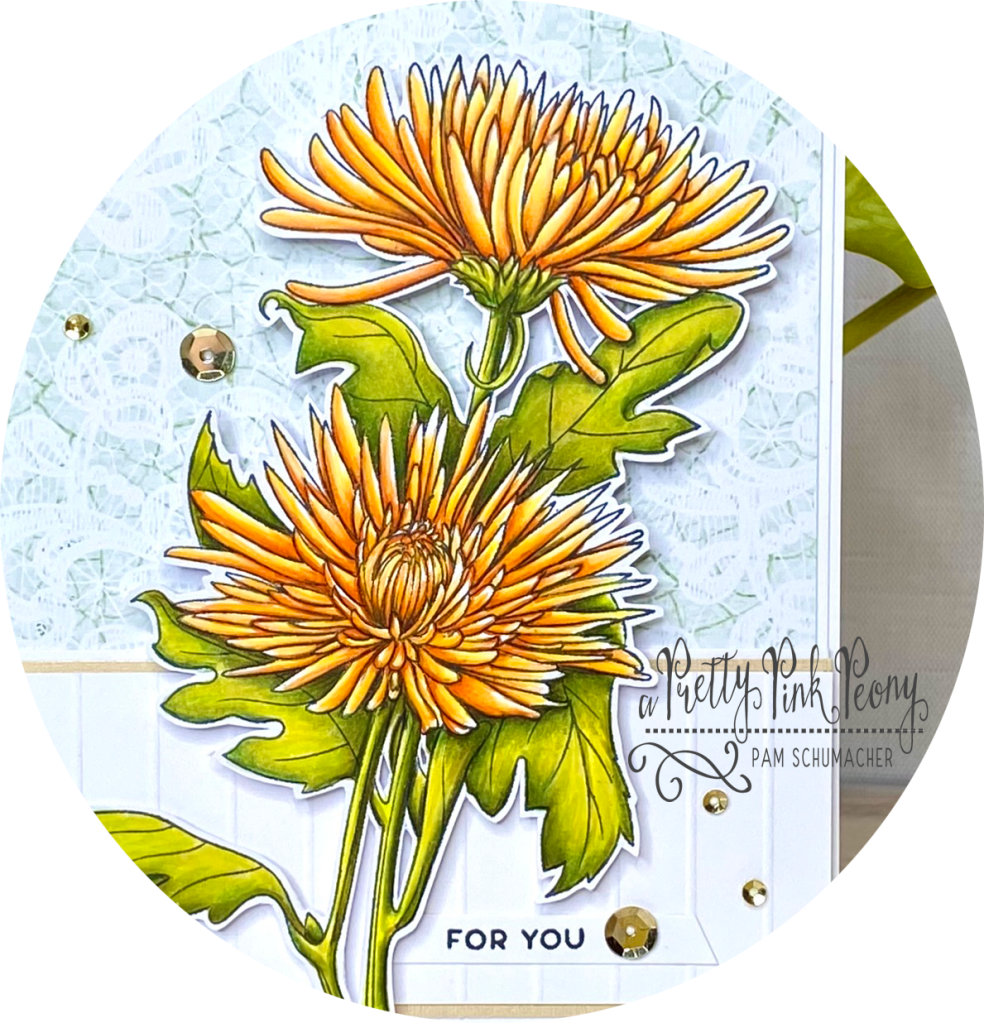
I stamped these beautiful flowers on X-Press It Blending Card and colored them with Copic Markers and Prismacolor Pencils.

I used the pretty border die called Creative Edges: Scalloped Scallops Die Set as the base for the bottom band. I added a layer of gold card stock as the second layer, carefully measuring just above the detail from the scallop side to where I wanted it from the top edge. For the top layer I used a slightly smaller piece of white cardstock scored in the middle, and then every 3/8″ in both directions.


A few tiny white pearls from my stash were added to the scallop detail. Lastly, I added a few gorgeous Altenew’s Satin Gold Sequins to my card. The sparkle is the perfect final touch.

Thank you so much for visiting today!

Crafty Hugs – Pam xx

You can also follow me on Instagram or my facebook page!

You make my heart smile

Hello and welcome!

I am back today after a little break away from crafting. I have been working on setting up some more crafty space to work in. Hoping it will be done soon.

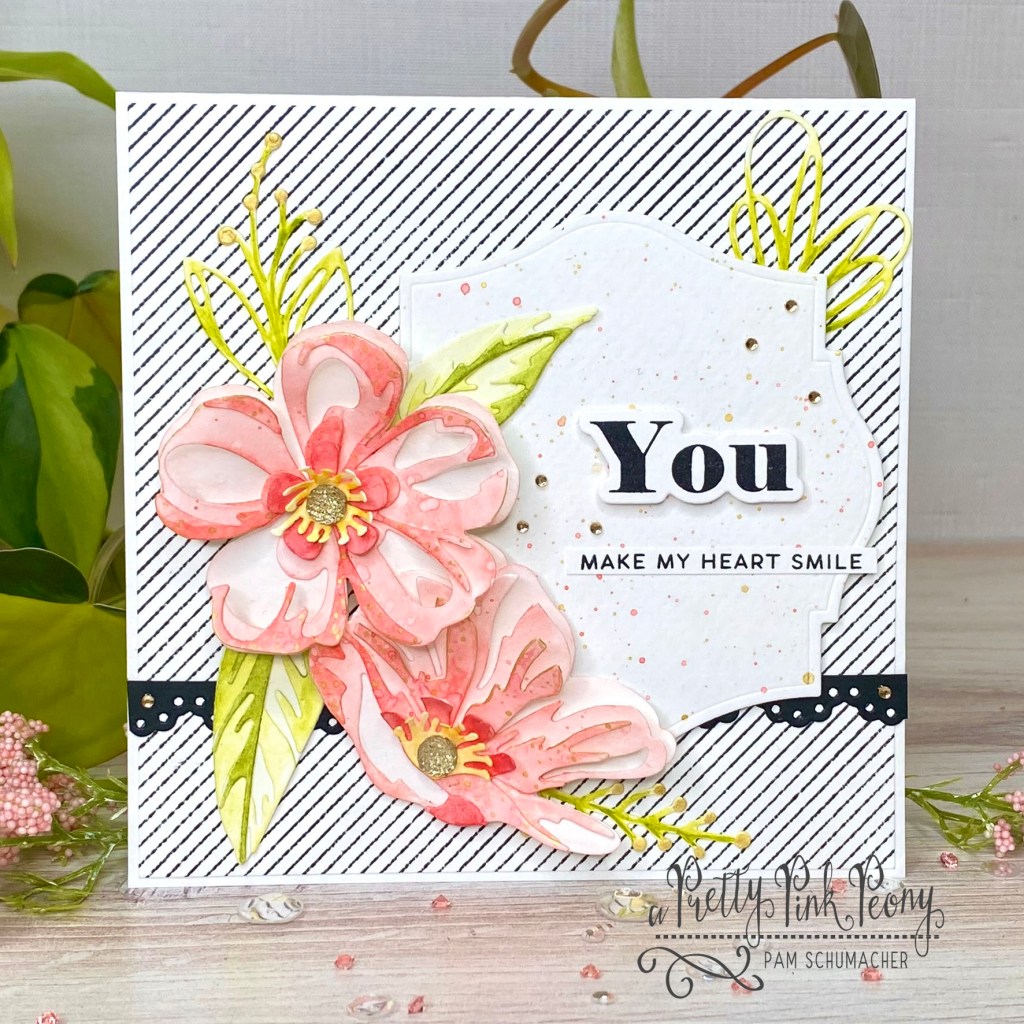
Imagine how excited I was when Altenew asked if I would be interested in working on a collaborated post with them. I have always loved their beautiful products, so of course I said yes…how exciting!!!

For today’s project I focused on these gorgeous flowers from the Craft-A-Flower: Cistus Layering Die Set. The extra greenery is from the die set called Leaf Mix Die Set.

All the flower and leaf pieces were die cut from watercolor paper and then colored with Altenew Watercolor 36 Pan Set. Once these pieces were dry, I added some accents with gold craft paint.


I knew I wanted the flowers to be dimensional so I only glued them in the center portion. This would allow me to bend and curl the layers of petals.

I stamped the stripe background with the stamp set called Pinstripe Stamp Set. The eye catching shape I used for the sentiment base is from the Labels & Tags 2 Die Set. This piece was ink splattered with the same watercolor paints and gold craft paint that I used above.

The sentiment is from the Bold Bouquet Stamp Set. I also used the matching Bold Bouquet Die Set.

The black lacy border is from the Creative Edges: Scalloped Scallops Die Set.

I really love how this project turned out!!

Thank you so much for visiting today!

Crafty Hugs – Pam xx

You can also follow me on Instagram or my facebook page!

World Card Making Day Blog Hop with Ink n’Splatter

Happy World Card Making Day!!

I am so excited to join with Ink n’Splatter’s Design Team for World Card Making Day!!

Ink N’ Splatter is celebrating this creative occasion with a Halloween, Fall & Christmas/Winter themed blog hop.

The fun part for you is getting the chance to win a $25 gift certificate to the Ink N’ Splatter store.

To be eligible for the prize:

Leave a comment at all the stops listed below (clicking on their name will take you to their blog)

All comments must be left by midnight on Thursday, October 12th (EST).

The winner will be announced on the Ink N’ Splatter blog on Friday, October 13th.

Have fun and enjoy!

Let’s start the fun and get this hop started!
We have a wonderful line up from the design team.

Kitty
Meghan
Cindy
Tania
Julie
Pam (you are here)
Vanessa
Dina
Ink n’Splatter

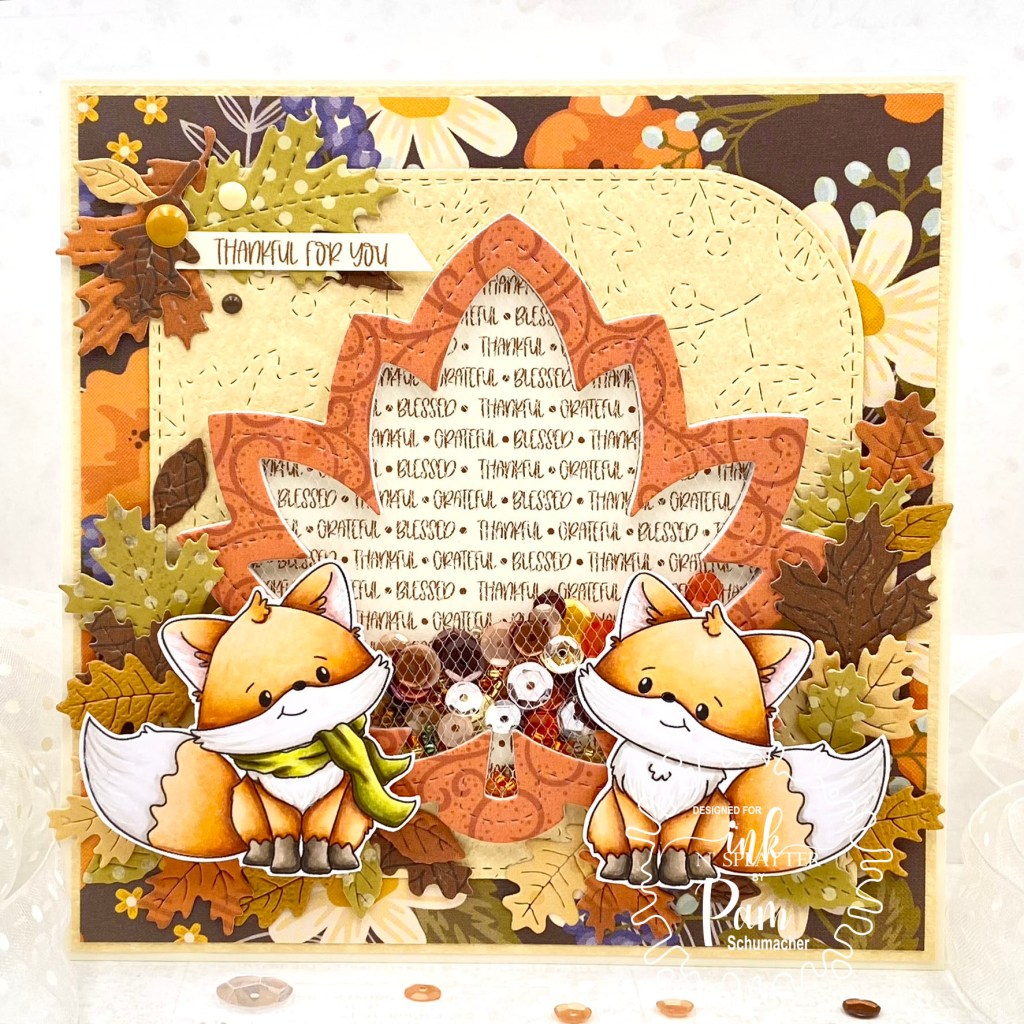
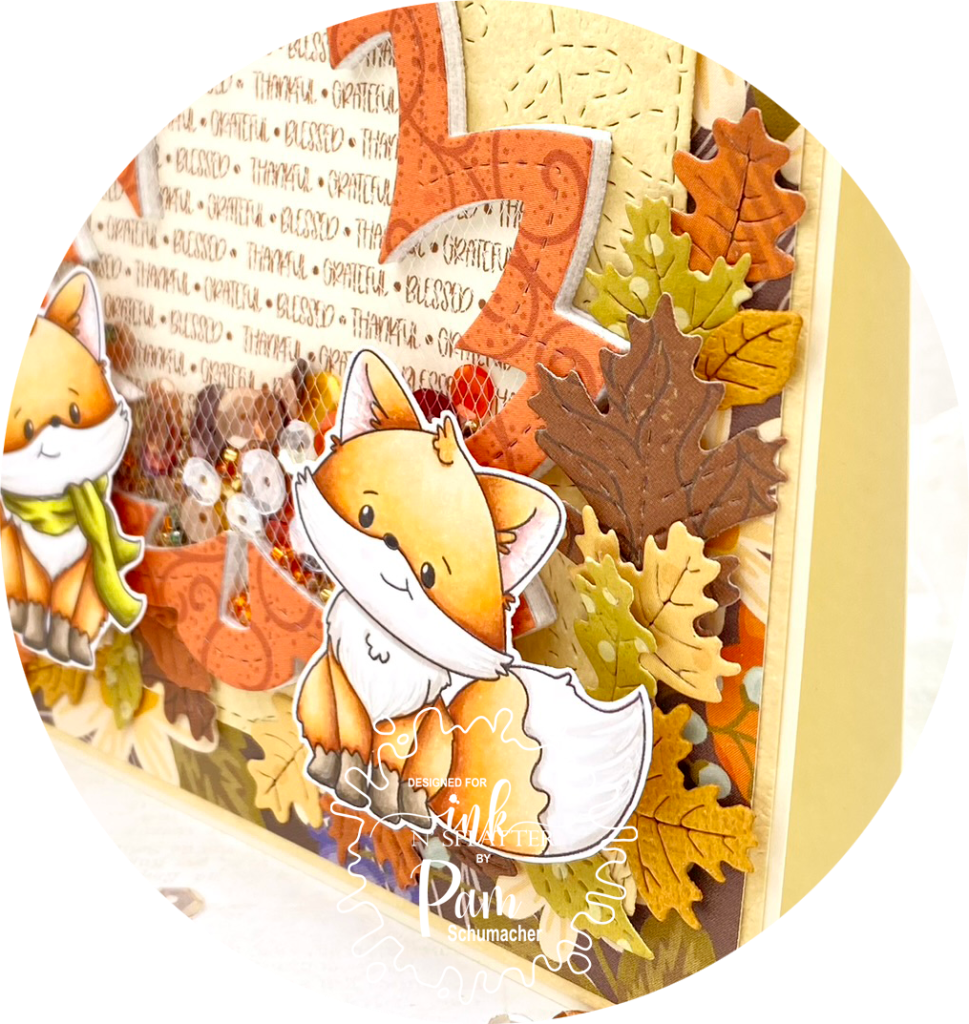
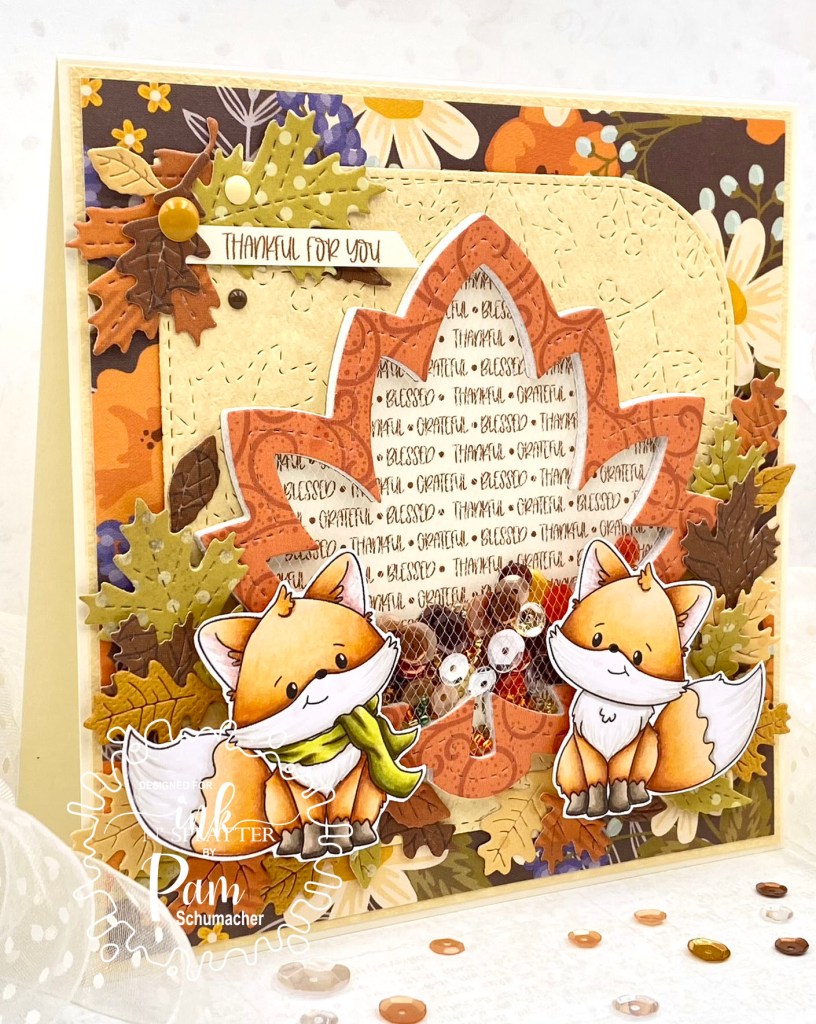
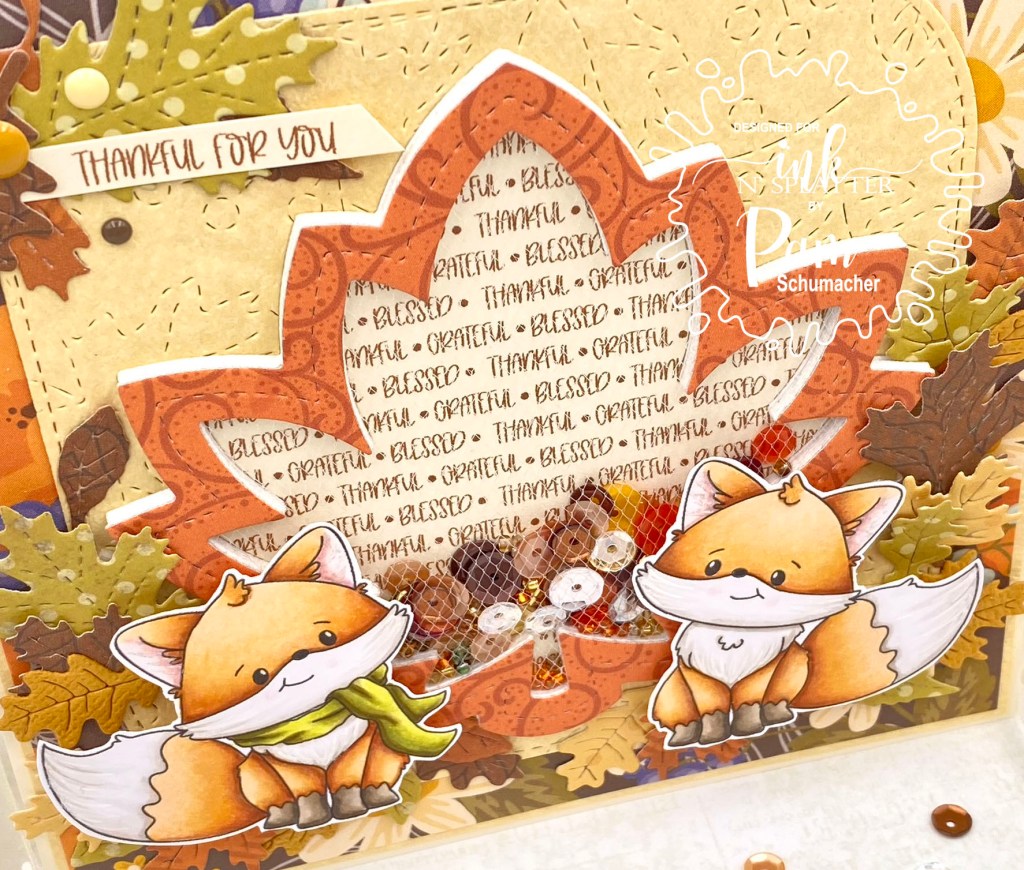
I chose a fall theme card that features these super adorable little foxes from the Happy Fall Foxes Stamp Set. I couldn’t resist…just look at those sweet faces and big fluffy tails!!

I stamped these little sweet little furballs on X-Press It Blending Card with Memento Tuxedo Black Ink and colored them with the following markers.

~Copics~
Foxes: YR27, E99, E97, YR21, Y21, E51, E93, W1, W00
Feet: W7, 5, 2 – E44, E43, E42
Green: YG97, YG95, YG93, YG91, YG21

I started with a 5×5 card base with the top two layers being 1/8″ smaller each layer.

To create the shaker element I die cut the leaf shape once out of the orange print paper, the word paper, and 5 times out of thick white card stock. When you cut this die it gives you a frame and a plain leaf from the center. I used the inside portion of the leaf frame die for the background of the shaker frame.

I attached the white tulle to the back of the orange leaf frame with double sided scor-tape and then attached the first white frame with more scor-tape. The remaining 4 white frames were glued to the tulle ‘sandwich’ one layer at a time. I then added my shaker bits on top of the word print leaf and carefully glued the orange frame stack to the card front making sure that it was lined up perfectly. I used white tulle for the shaker front instead of acetate so I didn’t have a glare on the front.

The dies used on my card:

Concord & 9th – Stitched Leaves Card Front Die
Lawn Fawn – Stitched Maple Leaf Frame
Lawn Fawn – Stitched Leaves
Spellbinders – Mini Fall Blooms


As always you can find an abundance of Ink n’Splatter products for sale here.

Thanks for visiting today!

Crafty Hugs ~ Pam xx

You can also follow me on Instagram or my facebook page!

EEK!

Hello everyone!

Squeeeeee…I am so in love with how this card turned out!!

This adorable little Halloween Bat is from Copictopia Creative, and is found in the clear stamp set called ‘Halloween Just Batsy‘.

I stamped this adorable little bat on X-Press It Blending Card and colored it with the following markers.

~Copics~
Grays: W3, W2, W1, W0, W00
Ears: R20, R30, R00, R000, W2, W0
Orange: YR18, YR16, YR15, YR12, Y35
Green: YG67, YG63, YG61
Brown: E44, E43, E42
Fine details added with Prismacolor Colored Pencils

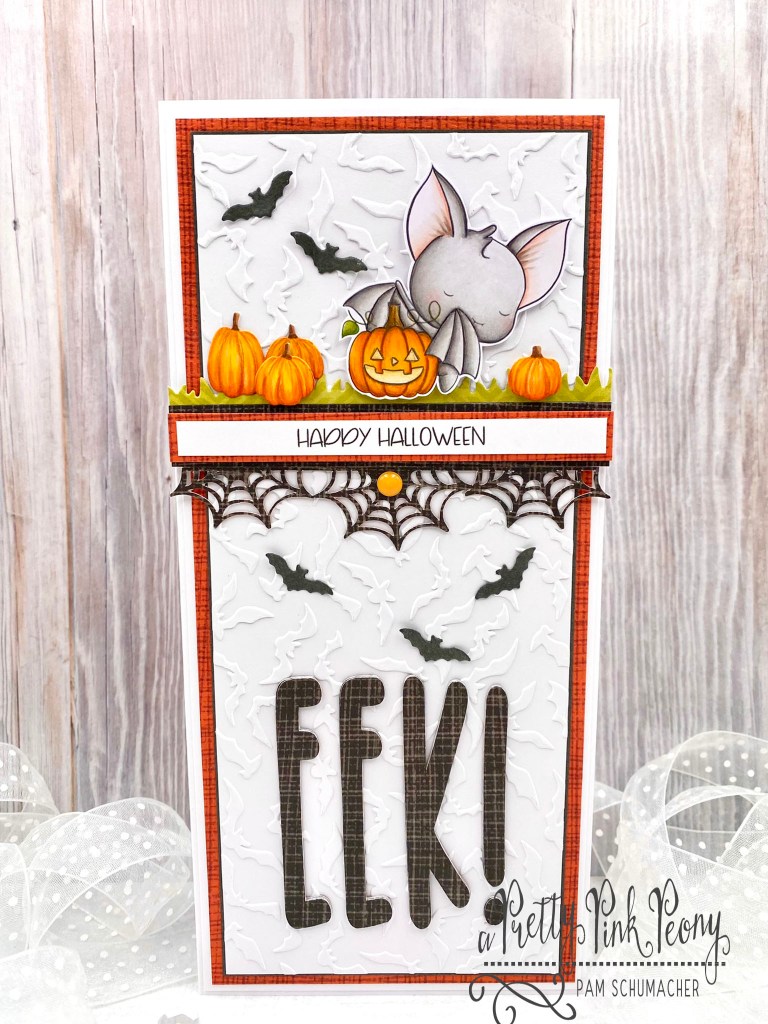
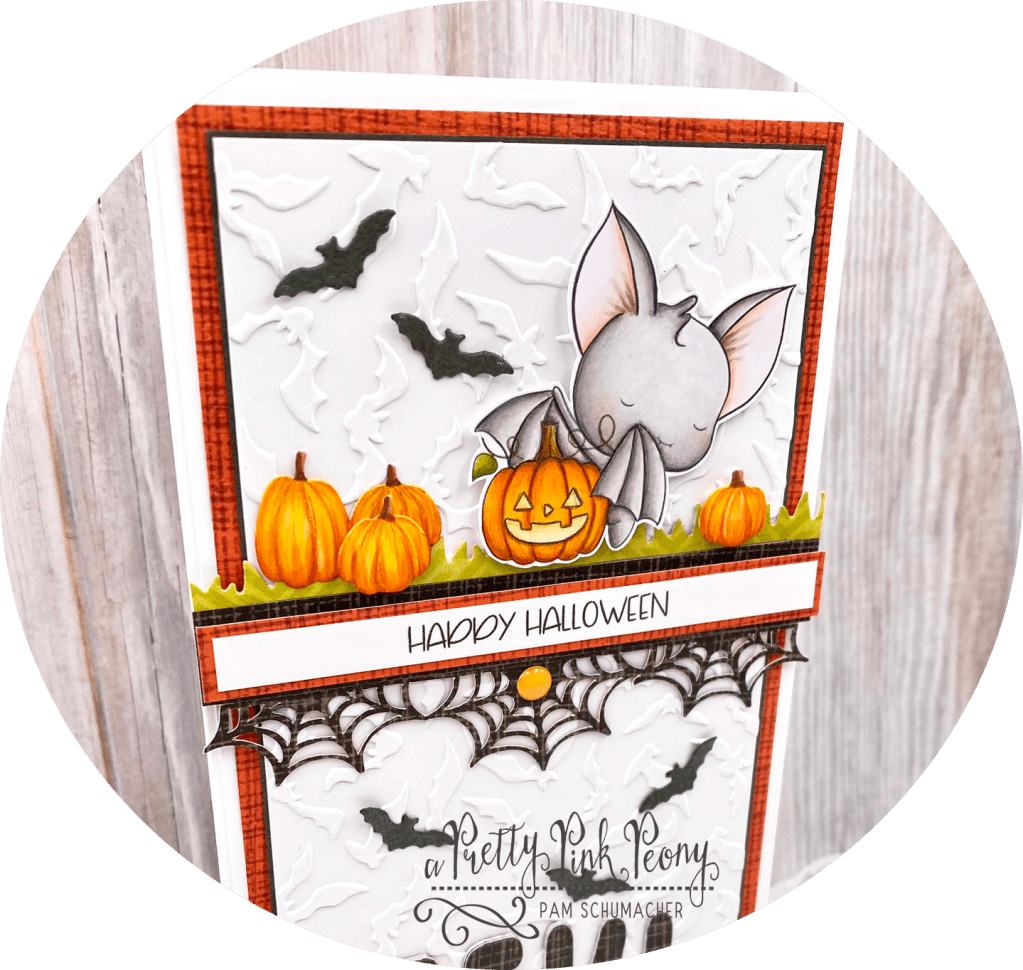
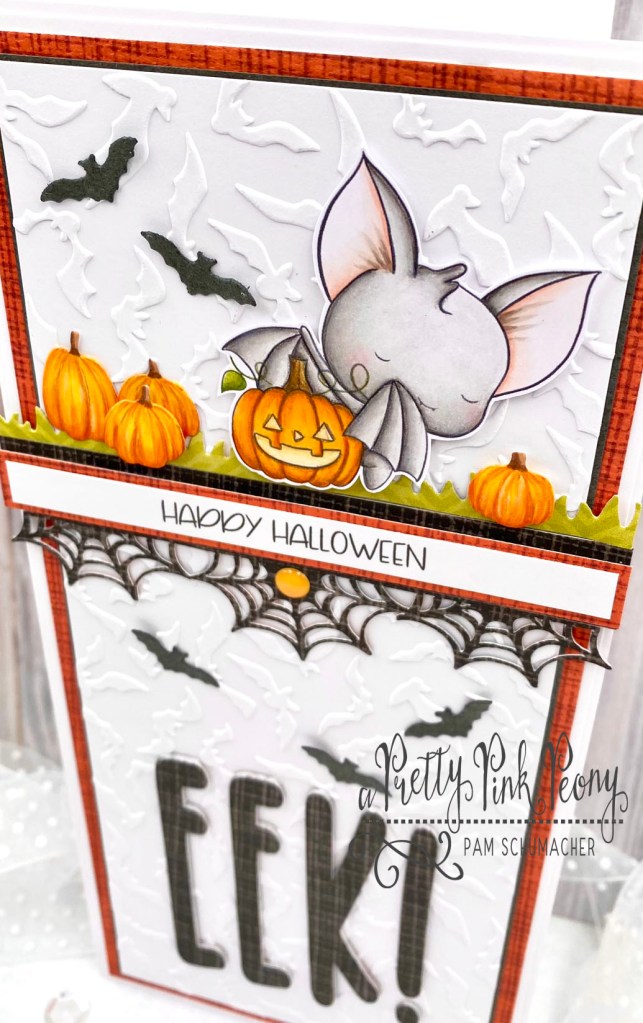
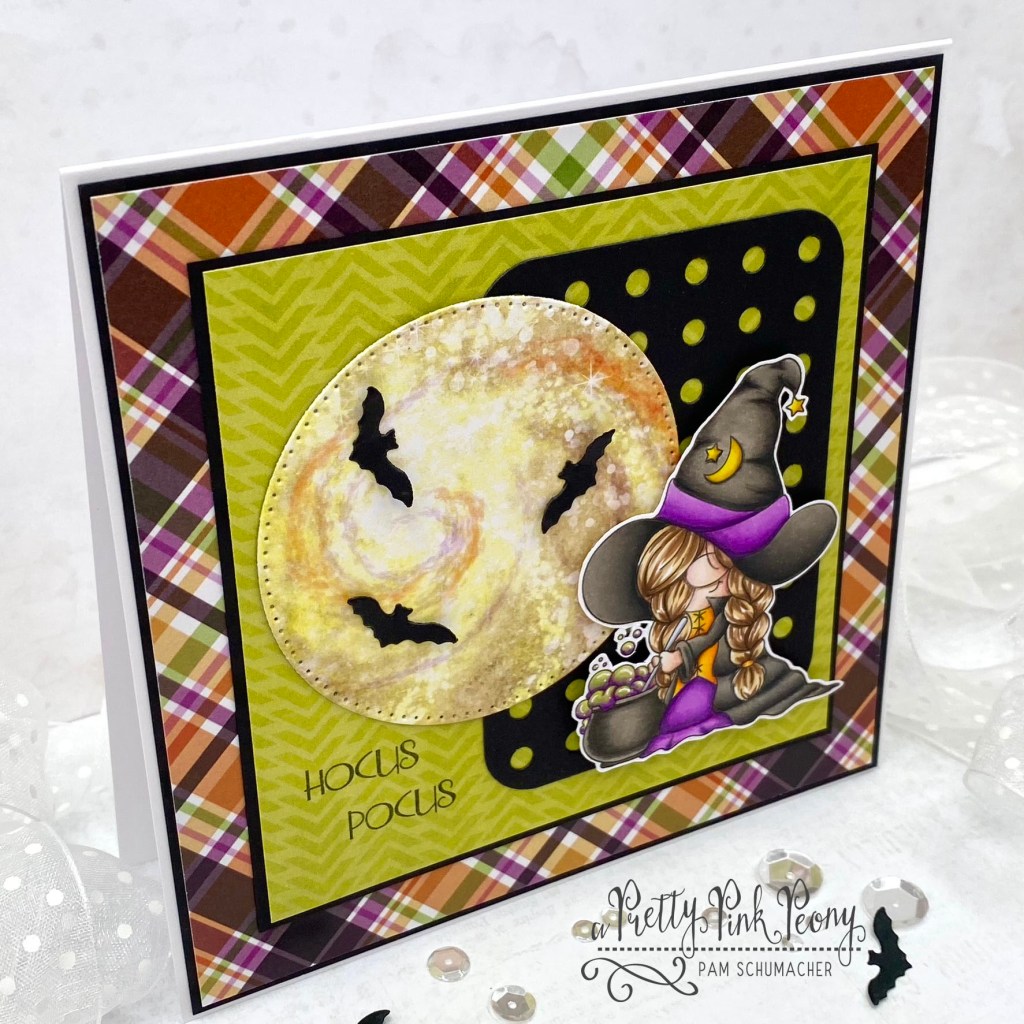
I started with the bat embossing folder from Whimsy Stamps as my inspiration. I filled the space at the bottom of my card first using the word EEK that I cut out on my Cameo Silhouette. I cut it three times and glued the pieces together as a stack to add dimension.

I then stamped the sentiment from the stamp set adding borders to make it stand out, but still felt it was lacking something. I found this cobweb border from the Silhouette store and trimmed it down to fit my card. I added a few bats and pumpkins to fill in the empty space.

As always, you can find an abundance of adorable images for sale here.

Thanks for visiting today!

Crafty Hugs – Pam xx

You can also follow me on Instagram or my facebook page!

Cute Christmas Tags

Hi friends,

Cute Christmas tags add such a personal touch to gift giving. These sweet little cuties from Copictopia Creative’sCold Weather Penguins Stamp Set‘ were perfect for this size tag.

I have always wanted to have a small pet Penguin…I think they are absolutely the cutest!!

I stamped these sweet penguins on X-Press It Blending Card with Memento Tuxedo Black Ink and colored them with the following markers.

~Copics~

Gray: C6, C5, C3, C2, C1, C0, C00
White: E41, E40, C00, Colorless Blender
Cheeks: R30, R00
Holly Leaves: YG67, YG63, YG61
Greens: YG17, YG03, YG01, YG0000
Reds: R59, R46, R27, R24, R05
Horns: E44, E43, E42, E40
Beaks/Feet: YR18, YR16, YR15, Y35
Yellow: Y15
Fine Details added with Prismacolor Pencils
White Gel Pen

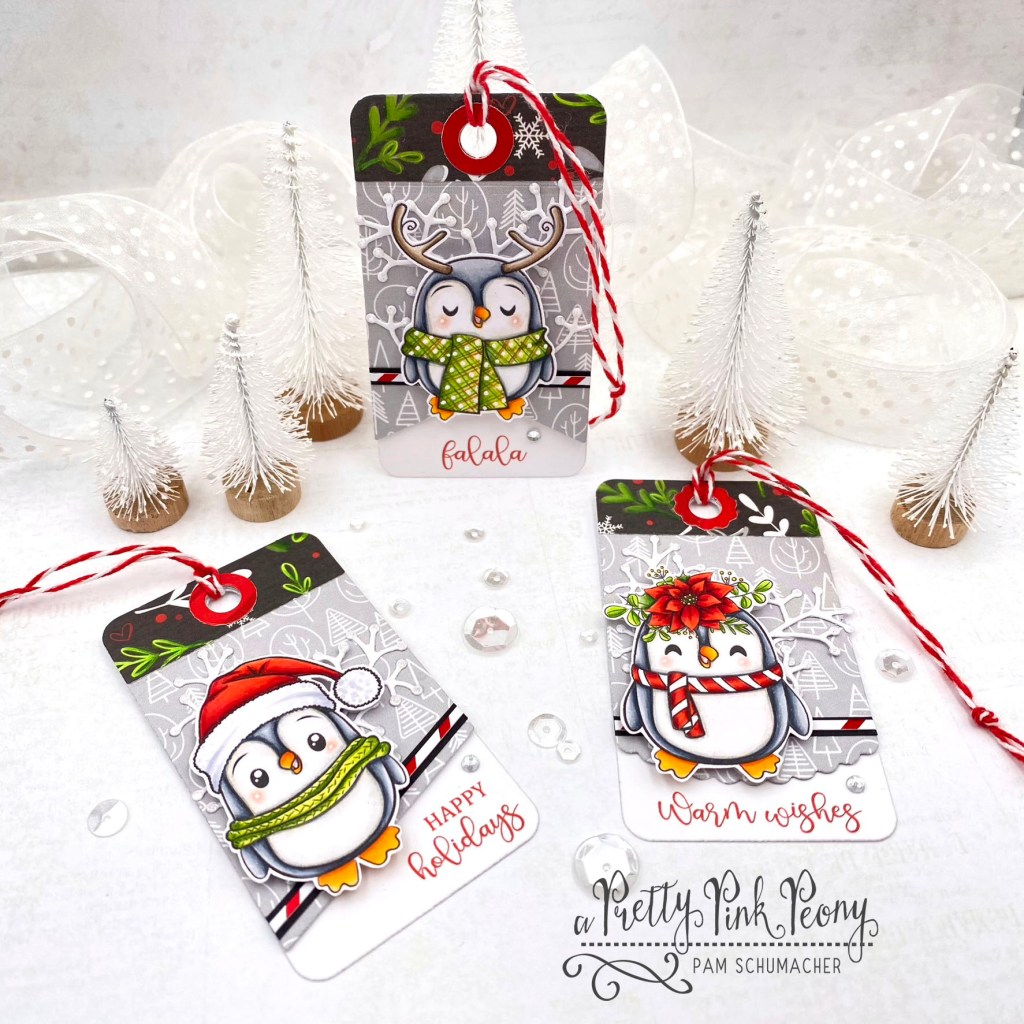
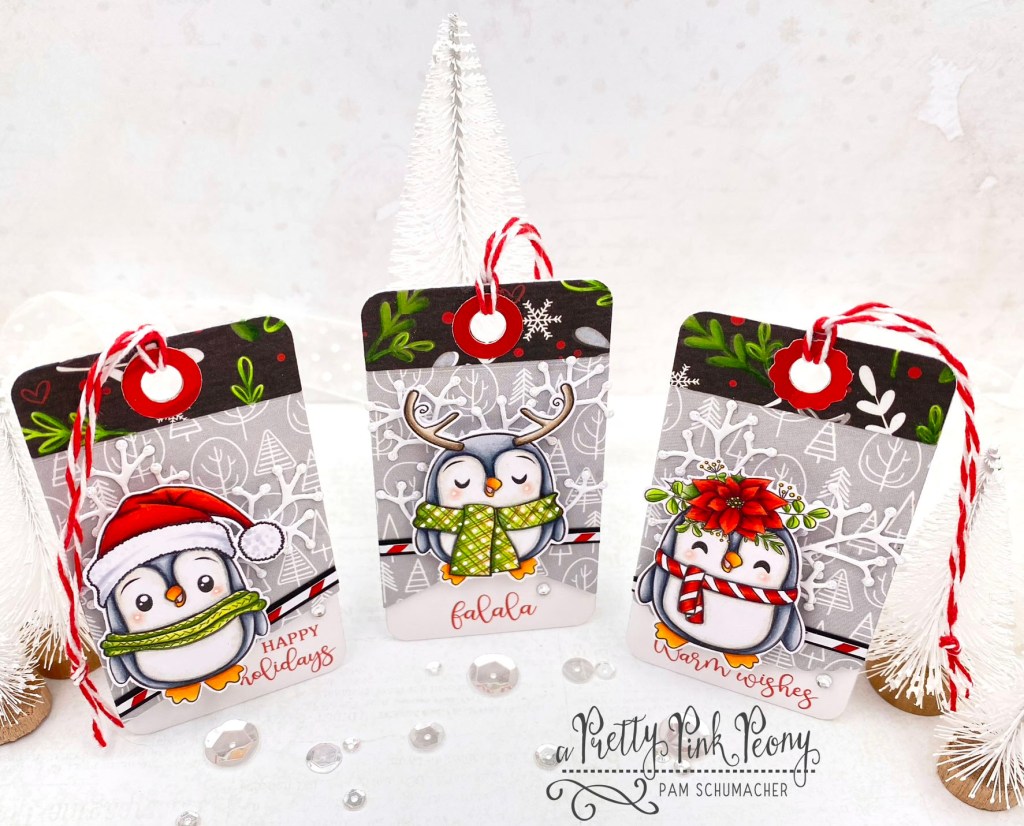
The black print paper at the top of the tags had no green in it, but for balance I wanted it to have some green. So to make it work I used colored pencils to add green over certain design elements. I had so much fun creating these and can’t wait to give them with a gift!

As always, you can find an abundance of adorable images for sale here.

Thanks for visiting today!

Crafty Hugs – Pam xx

You can also follow me on Instagram or my facebook page!

Gingerbread Kisses & Christmas Wishes

Hello and welcome!

I am back today with another guest card for Copictopia Creative featuring the adorable stamp set called ‘Gingies Clear Stamp Set‘.

I love the smell of gingerbread cookies baking…yummm!

I stamped these cute little Gingies on X-Press It Blending Card and colored them with the following markers.

~Copics~

Brown: E55, E33, E31, E30, E50
White: C3, C00
Red: R46, R29, R24
Cheeks: R32, R30
Fine details were added with Prismacolor Pencils
White Gel Pen

My idea was to make the Gingerbread cuties look like they were part of a Christmas garland. To achieve this I punch tiny holes in their hand with a paper punch and tied them together with red and white bakers twine. The bright red paper I used for the background is from the Hot Cocoa Time 6×6 Paper Pad.

As always, you can find an abundance of adorable images for sale here.

Thanks for visiting today!

Crafty Hugs – Pam xx

You can also follow me on Instagram or my facebook page!

Making Christmas Bright

Hi friends!

How exciting to be a guest designer for Copictopia Creative!! Today’s project features this adorable clear stamp called ‘Gifts Galore Meadow‘.

What kiddo, or adult for that matter, wouldn’t love to receive that big stack of gifts for Christmas?

This little sweetheart was stamped on X-Press It Blending Card and was colored with the following markers.

~Copics~
Skin: E04, E11, E21, E00, E000, E0000, R20, R30, R00
Eyes: G99, G94, YG01, B04
Hair: E57, E55, YR21, E51
Dress: BG15, BG13, BG11, R46, C2, C1, C0, C00
Red: R46, R27, R24, R14
Fine details were added with Prismacolor Colored Pencils
White Gel Pen

The beautiful paper I used on my card is from the Gingerbread Christmas 6×6 Paper Pad (blues), and the Hot Cocoa Time 6×6 Paper Pad (bright red).

As always, you can find an abundance of adorable images for sale here.

Thanks for visiting today!

Crafty Hugs – Pam xx

You can also follow me on Instagram or my facebook page!

Hocus Pocus

Hello witchy friends!!

Think she can really cast a spell from that cauldron??

I am back today to share a fun Halloween card with you featuring products from the new release at Ink n’Splatter Stamps.

This cute little witch is from the Halloween Gnomes Stamp Set. There are also coordinating dies available here.

~Copics~
Skin: E04, E11, E21, E11, E000, E0000, R20
Hair: E57, E55, E53, YR21
Yellow: YR23, Y15, Y11
Gray: W7, W6, W5, W4, W3
Orange: YR18, YR16, YR15, Y35
Purple: V09, V15, V04, V01
Stirring Stick: C4, C1
White Gel Pen


The spooky moon was cut out of the Tonight We Ride 6×6 Paper Pad. I carefully chose the part of the paper that would closely resemble the moon surface. The plaid background is from the Tricks n’Treats 6×6 Paper Pad.

As always you can find an abundance of Ink n’Splatter products for sale here.

Thanks for visiting today!

Crafty Hugs ~ Pam xx

You can also follow me on Instagram or my facebook page!

Batty to the Bone

Hi friends!

Aren’t these bats just the cutest little things?

These sweet bats are from the this month’s new release at Ink n’Splatter Stamps. These little cuties are from the Little Boy Boos Halloween Stamp Set. Coordinating dies are available here.

The sentiment that I used on my card is from the Sweet and Spooky Halloween Stamp Set, which also has coordinating dies available here.

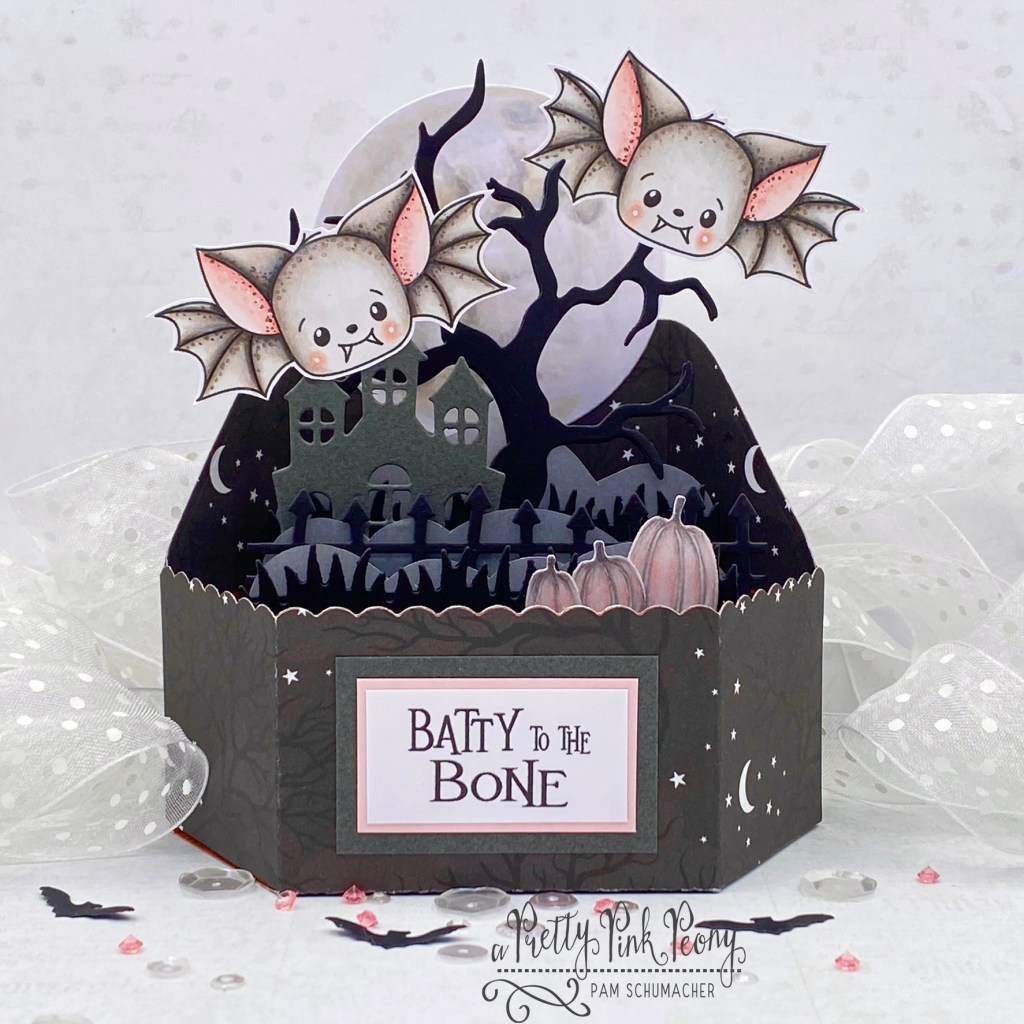
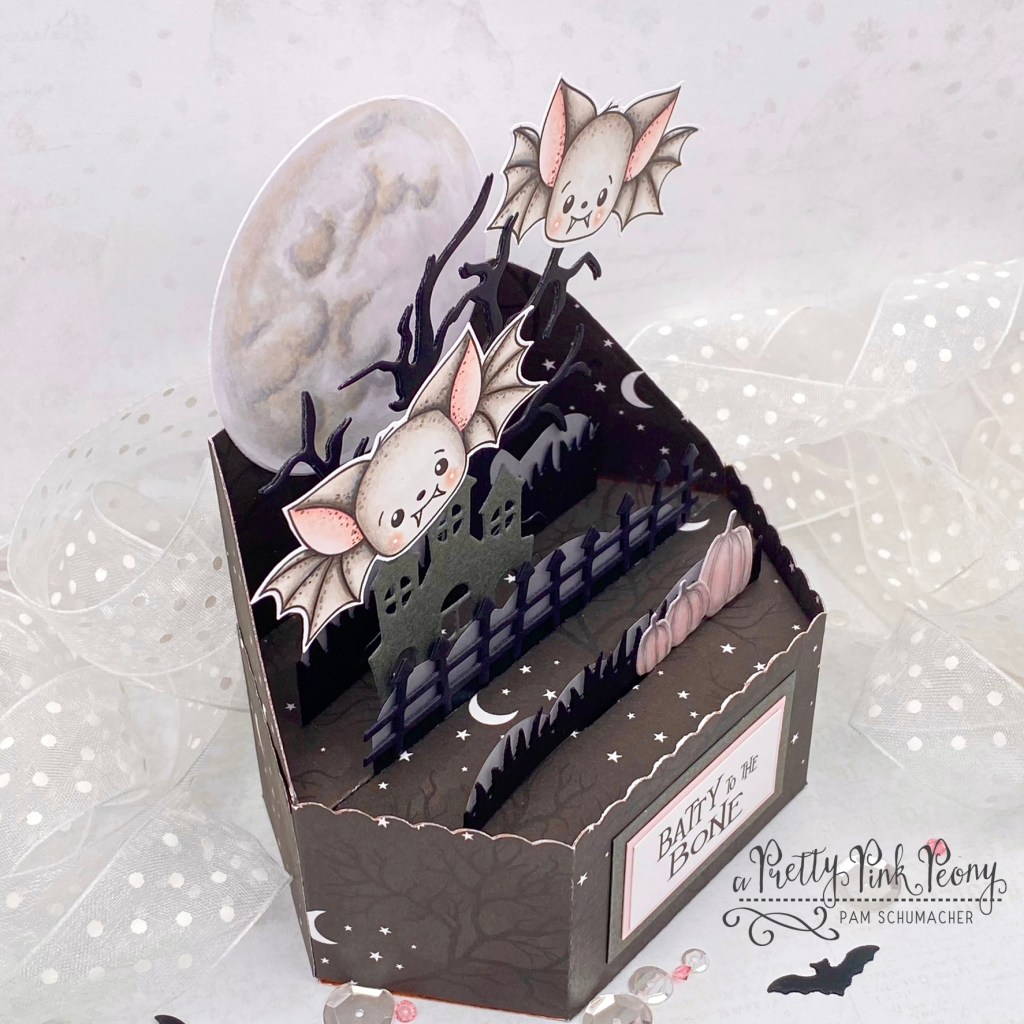
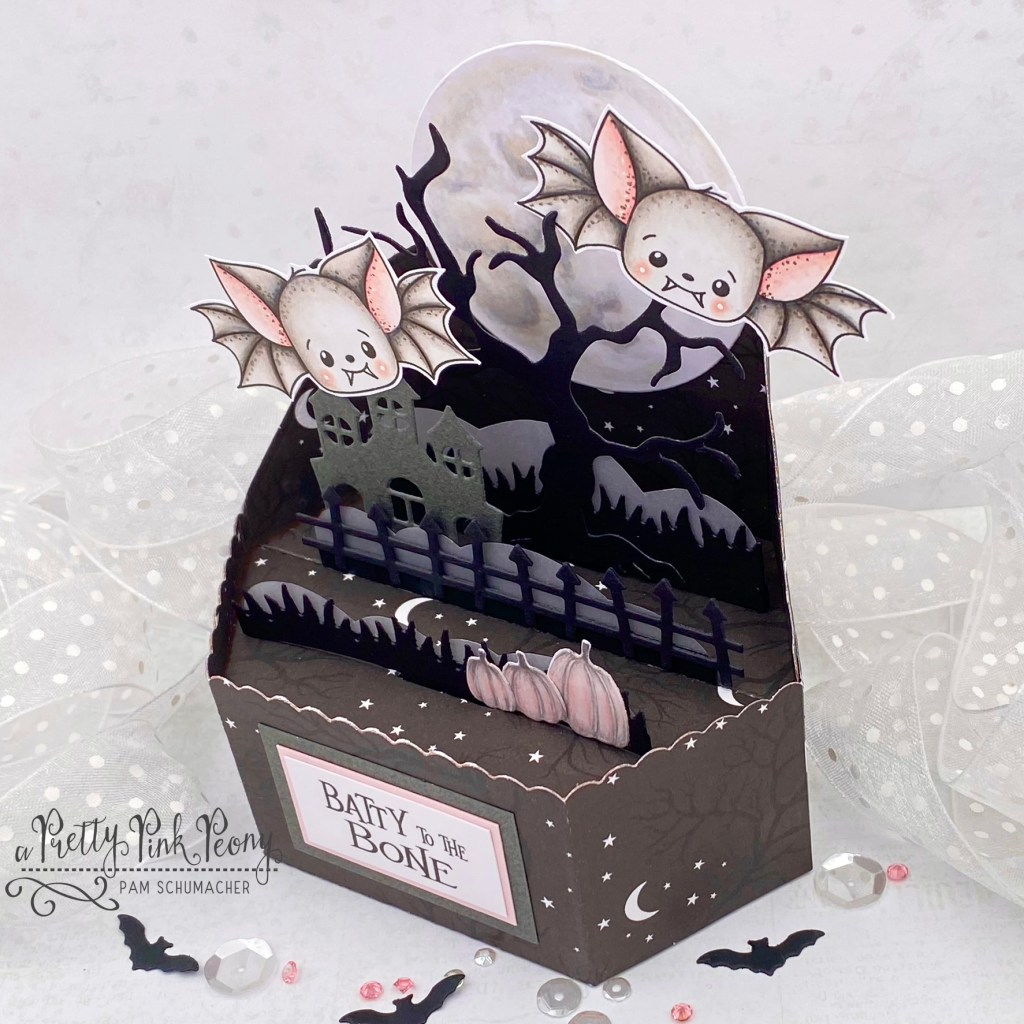
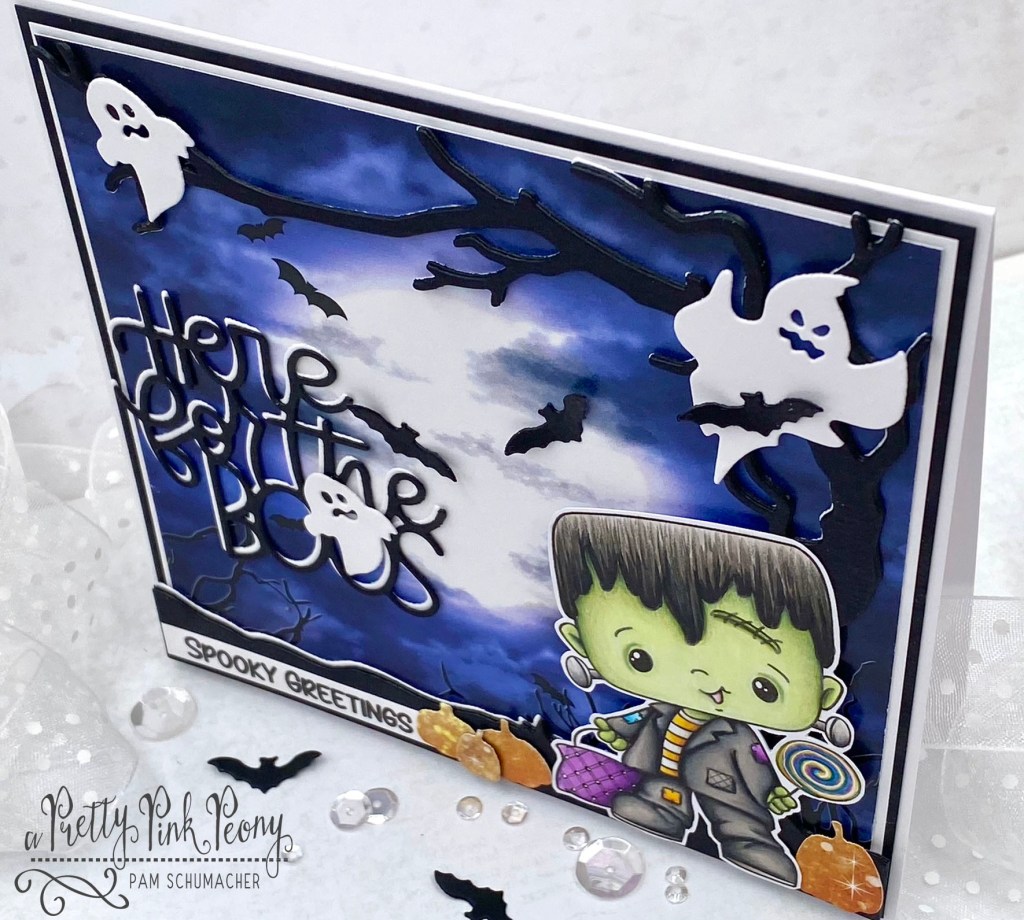
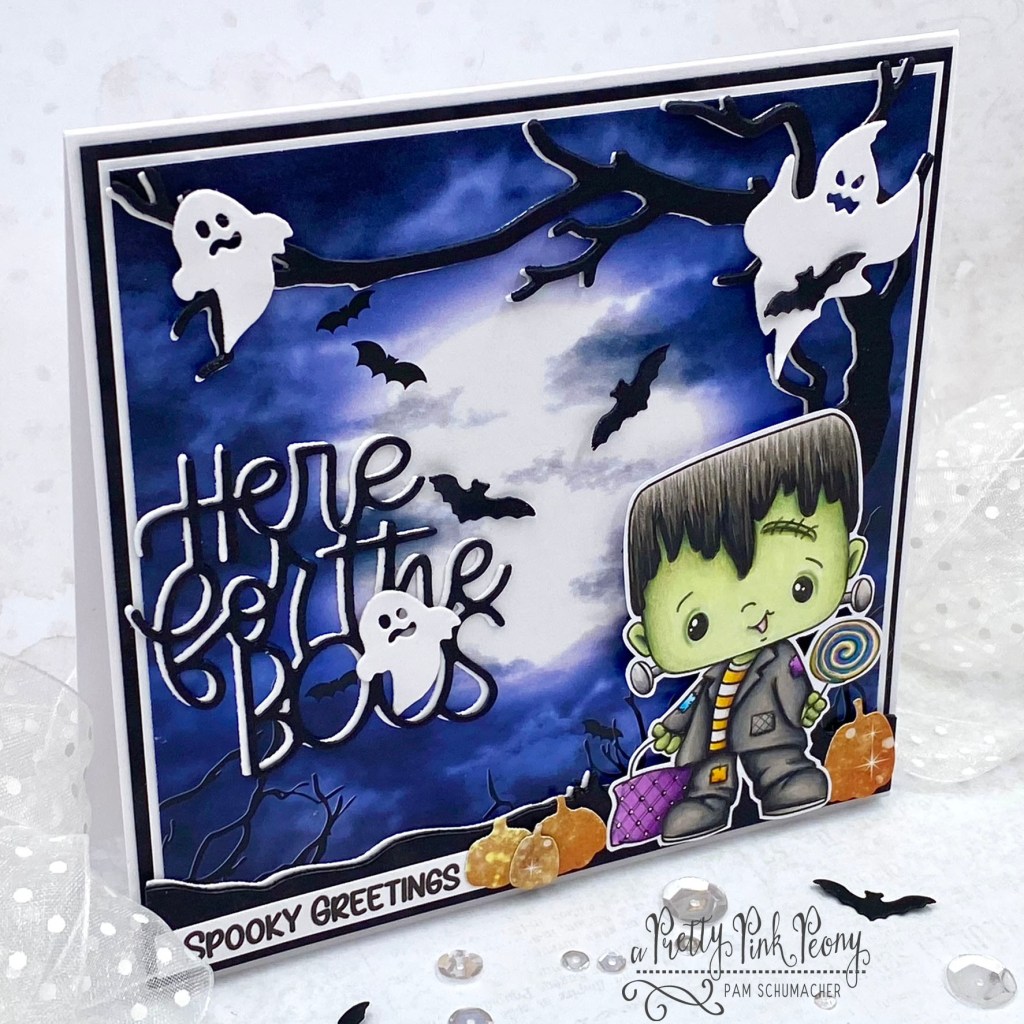
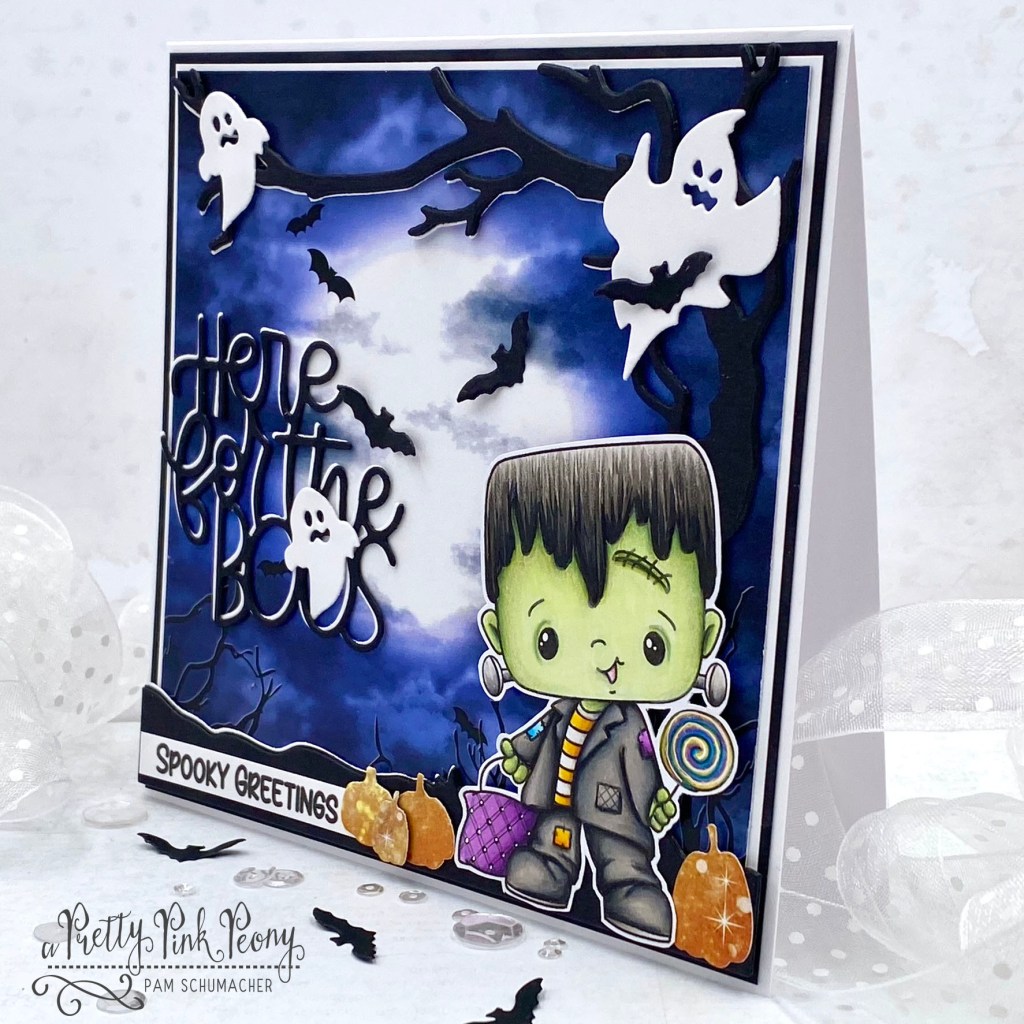
These little cuties were stamped with Memento Tuxedo Black Ink on X-Press It Blending Card and and were colored with the following markers.

~Copics~
Bats: W6, W5, W4, W3, W2, W1, W0, R20, R30, R00, R000 – White Gel Pen
Pumpkins: W4, W2, W1, W0, R20, R00
Moon: W4, W3, W2, W0, W00, YR30, E40
Fine details were added with Prismacolor Pencils

I had the coloring done and images cut out before I even knew what I was going to do with them. I had recently purchased the Lawn Fawn Platform Pop Up Die and the coordinating Platform Pop-Up Add-on and decided I would try a box card for a change.

The paper I chose had an orange print on the opposite side, so I had to come up with some creative thinking so that wouldn’t show…orange kind of clashes with pink…lol! Once I had that all figured out I dug through my dies to find things that would go together and that would fit inside the box.

With the box, grass, fence, and tree being all black I decided to cut out some cloud shapes to resemble a creepy ground fog.

To create the moon, I die cut a circle with the X-Press It Blending Card and just started blending colors together until I thought it looked like a moon.

As always you can find an abundance of Ink n’Splatter products for sale here.

Thanks for visiting today!

Crafty Hugs ~ Pam xx

You can also follow me on Instagram or my facebook page!

Here for the boos

Hello and welcome!

I am playing along with the Ink n’Splatter Stamps design team this month with the fun and spooky ‘Haunting Halloween Release’.

For my card today I have used cute little ‘Frankie” from the Little Boy Boos Stamp Set.

The little dude was stamped with Memento Tuxedo Black Ink on X-Press It Blending Card and was colored with the following markers.

~Copics~
Skin: G20, BG90, BG93, BG96, YG91, YG61
Orange: YR18, YR16, YR15, Y35
Blue: B05, B04, B02, B01
Purple: V17, V15, V12
Grays: 100, W8, W7, W5, W4, W3
Fine details were added with Prismacolor Colored Pencils.

The bckground for my card is from the ‘Tonight We Ride 6×6 Pattern Paper Pad‘. The papeer was the perfect backdrop for this little cutie!

Some of the die cut pieces were cut out of black and white to make them stand out a little more against the dark blue.

As always you can find an abundance of Ink n’Splatter products for sale here.

Thanks for visiting today!

Crafty Hugs ~ Pam xx

You can also follow me on Instagram or my facebook page!